Wednesday, December 21, 2016

Brocade VDX 6740T

one of the VDX 6740t switch in the logical chassis had partition corrupted. Brocade sent me a replacement. I followed the instruction  provided here http://www.brocade.com/content/html/en/administration-guide/nos-701-adminguide/GUID-FD3B87D5-E2F5-4C1A-A01C-4061ED597857.html

When I did #show vcs from the principal switch , the status showed replacing and unknown. 
#show fabric islports, ISL ports had ESC distributed Config DB Conflict error

Solution:
1. Shutdown the all the ISL ports on the new/replacement switch.
2. #copy default-config startup config


Monday, November 21, 2016

SharePoint 2016 Certificate Error

Log Name:      Application
Source:        Microsoft-SharePoint Products-SharePoint Foundation
Date:          11/21/2016 1:05:11 PM
Event ID:      8321
Task Category: Topology
Level:         Critical
Keywords:    
User:          CONTOSO\spservice
Computer:      CONTOSO-SP2.contoso.com
Description:
A certificate validation operation took 10936.6009 milliseconds and has exceeded the execution time threshold.  If this continues to occur, it may represent a configuration issue.  Please see http://go.microsoft.com/fwlink/?LinkId=246987 for more details.

Solution:
Install the SharePoint Root Authority certificate in the Trusted Root Certification Authorities store.

The fix for the problem is to export the SharePoint Root Authority certificate using PowerShell and import it into the Trusted Root Certificate store.  Open the SharePoint 2013 Management Shell as an administrator.
$SProotCert = (Get-SPCertificateAuthority).RootCertificate
$SProotCert.Export(“Cer”) | Set-Content C:\SProotCert.cer –Encoding Byte

Open the Certificates MMC by opening a Run command and type MMC.  Choose File -> Add/Remove Snap-in.  Select the Certificates Snap-in and click Add.  On the next screen select Computer account and click Next followed by Local computer and Ok.

Right-click on Trusted Root Certificates and choose All Tasks -> Import


SharePoint 2016: Databases running in compatibility range, upgrade recommended

Title  Databases running in compatibility range, upgrade recommended.  
Severity  2 - Warning  
Category  Configuration  
Explanation  
The following databases have versions that are older than the current SharePoint software, but are within the backwards compatible range: 
SharePoint_AdminContent_7ab62081-07ab-4218-893b-4baace21803c. 
Remedy  
To achieve optimal results from these databases, use Upgrade-SPContentDatabase to upgrade Content databases, or psconfig.exe to upgrade other databases.  For more information about this rule, see "http://go.microsoft.com/fwlink/?LinkID=142697".
Failing Servers   
Failing Services  
SPTimerService (SPTimerV4) 

  1. Check database status:
    1. In Central Administration, navigate to: Upgrade and Migration > Upgrade and Patch Management > Review database status.
    2. Found that the Central Administration content database was listed as Database is in compatibility range and upgrade is recommended.
Solution:

Execute PSCONFIG
    1. In an elevated SharePoint Management Shell, executed: Psconfig.exe -cmd upgrade -inplace b2b -wait -force.  Completed successfully.

      Psconfig.exe -cmd upgrade -inplace b2b -wait -for
      SharePoint Products Configuration Wizard version 16.0.4444.1000. Copyright (C) M
      Microsoft Corporation 2016. All rights reserved.
      Performing configuration task 1 of 4
      Initializing SharePoint Products upgrade...
      Waiting to get a lock to upgrade the farm.
      Successfully initialized the SharePoint Products configuration.
      Performing configuration task 2 of 4
      Initiating the upgrade sequence...
      Successfully initiated the upgrade sequence.
      Performing configuration task 3 of 4
      Upgrading SharePoint Products...
      100.00% :
      Successfully upgraded SharePoint Products.
      Performing configuration task 4 of 4
      Finalizing the SharePoint Products configuration...
      Successfully completed the SharePoint Products configuration.
      Total number of configuration settings run: 4
      Total number of successful configuration settings: 4
      Total number of unsuccessful configuration settings: 0
      Successfully stopped the configuration of SharePoint Products.
      Configuration of the SharePoint Products has succeeded.

    1. Navigate to: Upgrade and Migration > Upgrade and Patch Management > Review database status
Run it in all the Sharepoint servers if you have more than one.
"PSConfig.exe -cmd upgrade -inplace b2b -force -cmd applicationcontent -install -cmd installfeatures

SharePoint 2016 Outgoing Email Issue

I was trying to configure SharePoint 2016 alerts on document library.  Connection to Exchange server was fine. I tested via telnet. I suspected that mail was not going out of SharePoint server. I ran the following script to find out:

http://jeffreypaarhuis.com/2013/02/12/send-test-email-from-sharepoint/
Run the following code with SharePoint Management Shell
1
2
3
4
5
6
7
8
9
$email = "test@test.com"
$subject = "Test subject"
$body = "Test body"
$site = New-Object Microsoft.SharePoint.SPSite "http://sharepoint"
$web = $site.OpenWeb()
[Microsoft.SharePoint.Utilities.SPUtility]::SendEmail($web,0,0,$email,$subject,$body)
// A True or False will confirm the message has been sent or not

Result: which means email was not going out.

Two errors registered in the events log:

(1)
Log Name:      Application
Source:        Microsoft-SharePoint Products-SharePoint Foundation
Date:          11/21/2016 8:19:06 AM
Event ID:      8311
Task Category: Topology
Level:         Error
Keywords:    
User:          CONTOSO\spinstall
Computer:      CONTOSO-SP1.contoso.com
Description:
An operation failed because the following certificate has validation errors:

Subject Name: CN=CONTOSO-EXCH
Issuer Name: CN=CONTOSO-EXCH
Thumbprint: F87558CA134A70981125CDF23FDF1A722D06D8A3

Errors:

 SSL policy errors have been encountered.  Error code '0x2'.

(2)
Log Name:      Application
Source:        Microsoft-SharePoint Products-SharePoint Foundation
Date:          11/21/2016 8:19:06 AM
Event ID:      7946
Task Category: E-Mail
Level:         Error
Keywords:    
User:          CONTOSO\spinstall
Computer:      CONTOSO-SP1.contoso.com
Description:
Cannot complete this action.

Please try again.


Solution:
I had configure outbound SMTP server with exchange IP. I modified it to use Exchange server's NetBios name: CONTOSO-EXCH
Go to Central Administration->System Settings->Configure Outgoing Email Settings-> Outbound SMTP Server - CONTOSO-EXCH

Outbound mails on SharePoint started to flow.

Wednesday, November 16, 2016

Copy files to VM from Outside on isolated environement

I have created a test environment where my vSwitch is not connected to any NIC adapters. I need to be able to copy files and folders to the VM to install applications. There is not functionality to allow me to copy and paste the files/folder unto a VM directly. I wish I could copy the files to datastore and copy it to VM from the datastore but that is not possible either.

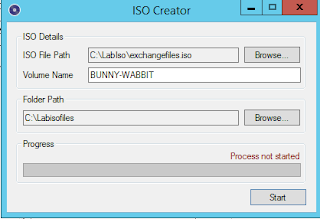
My solution: create iso from files/folders, copy to datastore and connect to CD/DVD image datastore on the vm where you are copying the files OR Mount them from your local disk. Windows does not have native tool to convert files/folder to ISO. I used ISO Creator  https://sourceforge.net/projects/iso-creator-cs/.

1. You can select the files/folders that you want to include in the ISO file as show below using ISO Creator.


2. Upload the ISO to the datastore.
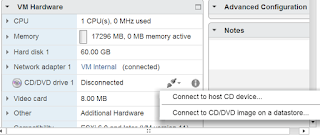
3. Mount an ISO to the CD/DVD drive of the VM: Used for loading the initial OS or installing other software.
  1. Under the VM Hardware section, click the CD/DVD drive 1 drop down.
  2. Choose Connect to CD/DVD image on datastore.
  3. Locate and select your .ISO file, then click Open.


Certificate Invalid in Exchange 2013

While installing certificate I encountered certificate invalid in Exchange 2013. I tried couple of times but with  no luck.

Checked if root certificate is missing from the Trusted Root Certificate Authorities on the Exchange server via MMC console. Loo and behold - wasn't there.

To resolve this issue,
1.  go to web enrollment http://caserver.abc.com/certsrv and Download CA Certificate.
2. Open MMC on Exchange Server and add certificate snap-in . Navigate to the path Console Root->Certificates->Trusted Root Certificate Authorities-Choose Import option by right clicking on the All Task.
3. Browse the certificate that you downloaded earlier. Place the Certificate in the Trusted Root Certification Authorities Store.
4. Refresh the Exchange ECP. Certificate should show valid.


Wednesday, September 14, 2016

WSUS client error DnldMgr Error 0x80244019

Clients were not able to download windows update. In the Windowsupdate.log, following entries were found


# WARNING: Download failed, error = 0x80244019


http://192.168.1.15:8530/Content/35/A49C2828A8DA7AC1B2F9F337D18E7D628C71F635.cab, local path = C:\Windows\SoftwareDistribution\Download\0135d679f6dc8ae16fb2353ef1ec1c4f\windows6.1-kb3177186-x64-express.cab
2016-09-14 14:22:35:785  956 860 DnldMgr Error 0x80244019 occurred while downloading update; notifying dependent calls.


Upon investigation, download directory was not right. Opening IIS Manager ->Sites->WSUS Administration->Content->Managed Virtual Directory->Advanced Settings->Physical Path was pointing to the wrong folder. After correcting the folder path, clients were able to download the updates.


**This was a replacement WSUS server that I stood up in preparation for windows 10 clients. Somehow during the configuration, it pointed to wrong wsuscontent folder location.

Friday, September 2, 2016

Powershell - Get GUID of installed program

Get a GUID of a installed program and Uninstall string or path of installed software programs

Get-WmiObject -Class Win32_Product -ComputerName . | Where-Object -FilterScript {$_.Name -like "Java 8 Update*"} | Format-List -Property *

Thursday, September 1, 2016

MSS Groupp Policy Settings

As per the new RMF directive, we are to follow the DISA STIG benchmark for Windows 7 and Windows Server 2012 R2. Although we will have months to go, I have started looking at implementing the security controls. "MSS" Group Policy are missing.

The "MSS" Group Policy settings are not and never have been included with a default, out-of-the-box installation of Active Directory. They were an add-on developed by a consulting group out in the field, and the settings were deemed so useful that they were included with the "Solution Accelerator" known as Security Compliance Manager. (It's been known under various similar names previously, such as "Windows 7 Security Compliance Management Toolkit.")
The problem is, the Security Compliance Manager comes with a whole bunch of junk that you do not want, such as a SQL Express instance. Junk that you really do not want to install on a domain controller. You only want to extract from it just the piece that you want, which is the "LocalGPO.msi" package.


Download the Security Compliance Manager installation. Run it on your server.Run the .exe, but do not continue with the installation. The installer deflates some files into a temp directory on the hard drive, such as C:\a1b2c3d4e5f6a0b1c2 or D:\a1b2c3d4e5f6a0b1c2. In that directory you will find a data.cab file. Open that file, and extract the file named GPOMSI and rename that file to LocalGPO.msi. Now cancel the SCM installer and it will delete the temp files.


Windows 7 and Windows Server 2012 R2
 
Install LocalGPO.msi on your server. Then launch the new "LocalGPO Command-line" shortcut that you will find in your Start Screen. Run it as Administrator. Type cscript LocalGPO.wsf /ConfigSCE.

Windows Server 2012 R2

The version that is hosted on this Microsoft blog written by Aaron Margosis contains a download link to a version of the MSS Extension that works for me with 2012 R2 with no 'hacking' required. That's a link to a zip file. Inside the zip file, you will see a directory named 'Local_Script'. Inside that folder, you will find a subfolder named 'MSS_Extension'. Simply transfer that MSS_Extension directory to your 2012 R2 domain controller. Then open a command prompt and browse to that directory. Then run:
Cscript LocalGPO.wsf /ConfigSCE

Advanced XML Filering in the Windows Event Viewer

I was trying to filter events on DC to check for NTLM & kerberos authentication. There are limitations using basic filtering.

I can use XML filtering and Custom Views.Custom Views using XML filtering are a powerful way to drill through event logs and only display the information you need. With Custom Views, you can filter on data in the event. To create a Custom View based on the username, right click Custom Views in the Event Viewer and choose Create Custom View.

Click the XML Tab, and check Edit query manually. Click ok to the warning popup. In this window, you can type an XML query. For this example, we want to filter by AuthenticationPackageName, so the XML query is:

 <QueryList> 
  <Query Id="0" Path="Security">
    <Select Path="Security">*[EventData[Data[@Name="AuthenticationPackageName"] = "NTLM"] and System[(EventID=4624)]]</Select>
  </Query>
</QueryList> 


<QueryList> 
  <Query Id="0" Path="Security">
    <Select Path="Security">*[EventData[Data[@Name="AuthenticationPackageName"] = "Kerberos"] and System[(EventID=4624)]]</Select>
  </Query>
</QueryList>

Thursday, June 30, 2016

Issue with WSUS after running June 2016 Patch

Problem: I normally patch WSUS server at the end. I ran a quarterly patch on WSUS server itself. Couple of hours after patching I found out that clients were not reporting to WSUS console. I have a GP to let the clients contact WSUS every hour.

On the windowsupdate.log on the client machines. The following warning was registered.
#Warning: Failed to find update with error code 8024008.
-Windows Update client failed to detect with error 0x80244008

WSUS server event viewer:

Event ID : 1310
Event Code : 3007
Event Message ; A compilation error has occurred.
Application Virtual Path  /ClientWebService
Error  BC31007: Unable to open module file 'C:\Windows\Microsoft\Framework64\v4.0.3031a\Temporary ASP.Net Files..............

Scouring the web, not close but got some clue that there might be permission issues.

Solution : Granted Full Access Rights to C:\Windows\Temp folder to the group IIS_IUSRS.

Lo and Behold, no new error 1310 reported in WSUS event viewer and clients started reporting to the WSUS console.

I am not sure whether the new .Net updates /patches changed something but the above solution worked.

Friday, June 3, 2016

vLAG from Brocade VCS LC to Cisco 6509

Just for configuration testing, I am creating single 10G FC vLAG from Brocade VDX to Cisco 6509. It is straight forwarded.

BrocadeSW:

interface port-channel 9
switchport
switchport mode trunk
switchport trunk allowed vlan all
no shutdown

Interface TenGigabitEthernet 5/0/48
channel-group 9 mode active type standard
no fabric isl
no fabirc trunk
no shutdown
lacp timeout long


on Cisco 6509

interface port-channel 9
switchport
switchport mode trunk
switchport trunl allowed vlan all

interface TenGigabitEthernet 8/4
channel-group 9 mode active type standard
switchport nonegotiate
no shutdown


Make sure port-channel 9 is up  and line protocol is up

show port-channel 10

Also make sure interface is up and line protocol is up.


show port-channel detail. Sync status should be 1 to show the link is functional.


Monday, May 16, 2016

Brocade VDX switch : Unable to ping to gateway (mgmt-vrf)


 VDX 6740, running NOS 5.0.0, I am trying to get firmware upgrade... I see in "Upgrade Guide":

You must configure the gateway and default route that is pointing to the management interface within the mgmt-vrf and address-family unicast context.

Here is my configuration on management interface:
=========================================
interface Management 1/0
no tcp burstrate
ip icmp echo-reply
no ip address dhcp
ip address 10.0.8.55/23
ipv6 icmpv6 echo-reply
no ipv6 address autoconfig
no ipv6 address dhcp
vrf forwarding mgmt-vrf

Config for the VRF
=========================================
rbridge-id 1
 vrf mgmt-vrf
  address-family ipv4 unicast
   ip route 0.0.0.0/0 10.0.8.1

I can ping to the address that was assigned to the interface:
=========================================
VDX6740# ping 10.0.8.55 vrf mgmt-vrf
Type Control-c to abort
PING 10.0.8.55 (10.0.8.55): 56 data bytes
64 bytes from 10.0.8.55: icmp_seq=0 ttl=64 time=0.169 ms
64 bytes from 10.0.8.55: icmp_seq=1 ttl=64 time=0.124 ms
....

But i cannot ping to the Gateway address 10.0.8.1

This is the show interface management, it looks fine?
=====================================
VDX6740# show interface Management
interface Management 1/0
ip address "static 10.0.8.55/23"
ip gateway-address 10.0.8.1
ipv6 ipv6-address [ ]
ipv6 ipv6-gateways [ ]
line-speed configured Auto

So now I can't reach to my FTP server via gateway, any suggestion or troubleshoot tips?

Answer:

Starting in version 5.0, enforced separation of the management and data plane was instituted. As a default ping will try to source from the default-vrf. Appending the vrf mgmt.-vrf is needed to source the pings in the management plane.

Brocade VDX : upgrading to new NOS, one of the partition does not get updated.

When upgrading to new NOS one of the partition does not get updated. Following is the only option to get the new NOS on both the partitions.

Requirement: you will have to contact Brocade Tech support to ship you a Brocade USB stick containing basic NOS.

1) Brocade USB stick containing basic unit operating system (in the safe)
2) Requires NFS mountable directory to access the new NOS.
3) Have console port access
After power cycle, hit ESC until you get here
Hit ESC to stop autoboot: 0
1) Start system.
2) Recover password.
3) Enter command shell.
Option? 3
Boot PROM password has not been set.
=> [This is the u-boot prompt]
These environment variables should be set at U-boot
printenv and check for these variables - ipaddr, netmask, gatewayip, serverip. If not set, then assign.
setenv ipaddr <IP address that you want to assign to this device>
setenv netmask <What is the subnet mask used in the lab where the switch is located?>
setenv gatewayip <xx.yy.zz.ww>
setenv serverip <tftp/ftp server ip used>
If these are changed
saveenv

Insert the USB, these are the steps are done at the U-boot prompt:
> usb reset 1
> ext2ls usb 0:1
> makesinrec 0x1000000; ext2load usb 0:1 2000000 tftpboot/castorXX/uImage;ext2load usb 0:1 3000000 tftpboot/castorXX/ramdisk.image;ext2load usb 0:1 4000000 tftpboot/castorXX/silkworm_bd131.dtb; bootm 2000000 3000000 4000000

When this finishes the unit should reboot and come up to a shell prompt. At that prompt enter the following information (management interface address, netmask and gateway).
ifconfig eth0 x.x.x.x netmask x.x.x.x up
route add default gw x.x.x.x

The NOS firmware is loaded using the following steps:

mount -o tcp,nolock <server>:<path>/nos5.0.1d /load
cd /load
./install release
sync
sync
reboot –f

After this finishes the switch should be fully functional with NOS 5.0.1d on both partitions.


Brocade VDX Fun ; SFP breakouts

Shortly I will be deploying bunch of Brocade VDX switches in Logical Chassis Mode to replace the existing Cisco 3750's.

I have a 40 GBPS QSFP+ breakout module.

To configure breakouts:

config t
hardware
connector 4/49
shut
exit
hardware
connector 4/49/1
sfp breakout

I later changed my mind and issued no sfp breakout command. The 40GB port went dead would not respond.

Here is what need to be done after issuing no spf breakout

Login to the LC primary switch
Go to the RBridge where you want to convert back the port
shutdown all the ISL ports that are connected to the LC
verify that all other switches show offline
run Copy default-config startup-config
reboot


Sunday, May 15, 2016

Exchange Server 2013 /PrepareAd for Cumultive update installation fails.

Today I was trying to update my Exchange Server 2013 CU4 (SP1) to CU10.

Following pre-installation tasks were done:

1. Stop Symantec Client protection service
2.Uncheck Check for Publisher's Certificate revocation & Check for server certificate revocation on IE
3.Run c:\>%windir%\Microsoft.NET\Framework64\v4.0.30319\ngen.exe update
   c:\>echo %errorlevel%

(The above steps are suggested to speed up the installation)
4. Run setup.exe /PrepareSchema /IAcceptExchangeServerLicenseTerms (requires Enterprise Admins and Schema Admins permissions, and must be performed in the same AD Site as the Schema Master on a server with the RSAT-ADDS-Tools feature installed – the Schema Master itself would meet these requirements)


5. Run setup.exe /PrepareAD /IAcceptExchangeServerLicenseTerms
As I went to do PrepareAD, it failed with the following error:
he following error was generated when “$error.Clear(); 
install-AdministrativeGroup -DomainController $RoleDomainController
” was run: “Active Directory operation failed on Servername.domain.com. The object
‘CN=Folder Hierarchies,CN=Exchange Administrative Group (FYDIBOHF23SPDLT),
CN=Administrative Groups,CN=Exchange Organization,CN=Microsoft Exchange,
CN=Services,CN=Configuration,DC=Domain,DC=Com’ already exists.”

Scouring the websites, I found the solution posted at Exchange Weblog

CN=Configuration,CN=Services,CN=Microsoft Exchange,CN=Your Exchange Organization,
CN=Administrative Groups,CN=Administrative group,CN=Exchange Administrative Group
(FYDIBOHF23SPDLT),CN=Folder Hierarchies

 
There are multiple methods to fix this issue , Here is the recommended method
by Recreating Public Folders containers.
Use ADSI Edit or a similar tool to locate and expand Exchange Administrative Group (FYDIBOHF23SPDLT).
The Public Folders object can be found at:
CN=Configuration,CN=Services,CN=Microsoft Exchange,CN=Organization,CN=Administrative Groups,
CN=Exchange Administrative Group (FYDIBOHF23SPDLT),CN=Folder Hierarchies
  1. Right-click the Folder Hierarchies object, click New, and then click Object.
  2. In the Select a class list, select msExchPFTree, and then click Next.
  3. In the Value box, type Public Folders, and then click Next.
  4. Click More Attributes.
  5. In the Select a class list, select msExchPFTreeType, and then click Next.
  6. In the Edit Attribute box, type 1, click Set, click OK, and then click Finish
https://blogs.technet.microsoft.com/manjubn/2013/09/02/1-exchange-server-2013-preparead-or-cumultive-update-installation-fails/

https://blogs.technet.microsoft.com/manjubn/2013/09/02/1-exchange-server-2013-preparead-or-cumultive-update-installation-fails/

After creating the new object, /PrepareAD completed successfully.

Friday, March 25, 2016

SlipStream Adobe Reader with Powershell to be deployed using SCCM or psexec

Deploying Adobe quarterly patch and the security update is pain specially when you have environment with no internet connection.

Note: You need to remove the older version of Adobe Reader in order be able to installed the slipstream version of Abode Reader.

Here is how I slipstream quarterly update with security patches

You can download the script from the TechNet Gallery.

To slipstream you need to download the following files from Adobe.
1. Base Installer ( eg. AdbeRdr11000_en_US.exe)
2. Quarterly Update
3. Security Patch

Ftp download link
ftp.adobe.com/pub/adobe/reader/win/11.x/11.0.06/en_US/AdbeRdr11006_en_US.exe

Apply the installer and patches in the following order:
Base Installer -> Quarterly Patch -> Security Patch
11.0.0->11.0.14 -> 10.1.15

Follow the steps to use the Power Shell Script:
1. Downloaded the necessary file(s) to a folder somewhere (should be a local drive or mapped network drive). I’ve downloaded AdbeRdr11006_en_US.exe to C:\Downloads. I’ll refer to this location as the Download folder in this post.
2. Create a folder called AIP. I’ve created it at C:\AIP and will refer to it as the TargetFolder.
3. Download the script from TechNet Gallery and extract it C:\Scripts.
4. Open an elevated PowerShell console, browse to C:\Scripts and run the following command:

.\New-AdobeReaderAIP.ps1 -FileName "AdbeRdr11006_en_US.exe" -DownloadFolder "C:\Download" -TargetFolder "C:\AIP"

5. The script will now start to slipstream Adobe Reader.


Copy the entire AIP folder to the destination computer and run the AcroReader.msi to install.


You can deploy remotely using psexec:

devices.txt contains the host names where you want to deploy it.

psexec @C:\adobe\devices.txt -h -u domain\username -p "password" -c xcopy /y /s "c:\AIP" c:\temp\update

psexec @C:\adobe\devices.txt -h -u domain\username  -p "password" msiexec.exe /i c:\temp\update\AcroRead.msi  /quiet /qn /norestart /l+ c:\temp\update-logs\log.txt

Wednesday, January 27, 2016

How to Move the Public Folder Hierarchy from Exchange 2003 Admin Group to the New Exchange 2010 Admin Group

This week as I was preparing to migrate Exchange 2010 to Exchange 2013 I found out that my previous predecessor did not decommission legacy Exchange 2003 properly.

When I ran get-exchangeserver, the older 2003 server was still showing. The public folder was still located in the Exchange 2003 Admin group.  When i ran get-routinggroupconnecter, it show the old connector.

Here is how to move the public Folder Hierarchy from Exchange 2003 Admin group to the New Exchange 2010 Admin Group:

Information

User is migrating from Exchange 2003 to Exchange 2007 or 2010 and wants to move the public folder hierarchy from the Exchange 2003 "First Administrative Group" to the new Exchange 2007/2010 "Exchange Administrative Group (FYDIBOHF23SPDLT)" to continue decommission the old Exchange 2003 Admin Groups.

Details

Use one of the following procedures to move the public folder hierarchy to a new Admin Group:
Using exchange system manager:
  1. Logon to the Exchange Server 2003 server and open the Exchange System Manager snap-in.
  2. Expand the Administrative Groups and right-click the Exchange Administrative Group (FYDIBOHF23SPDLT) , select New and select Public Folders Container .
  3. Then expand the old First Administrative Group , expand Folders and move the Public Folders tree to the Public Folders container you created in the previous step by dragging the Public Folders tree object and dropping it to Folders under Exchange Administrative Group (FYDIBOHF23SPDLT) .
Using ADSIEdit tool:
If already uninstalled all Exchange 2003 servers and do not have any Exchange System Manager elsewhere to use, same can be done with ADSIEdit.
  1. Create the new Public Folders container:
    1. Use ADSI Edit tool to locate and expand Exchange Administrative Group (FYDIBOHF23SPDLT) object, which can be found at:
      CN=Configuration,CN=Services,CN=Microsoft Exchange,CN=Organization,CN=Administrative Groups.
    2. Right-click the Exchange Administrative Group (FYDIBOHF23SPDLT) object, click New , and then click Object .
    3. In the Select a class list, select msExchPublicFolderTreeContainer , and then click Next .
    4. In the Value box, type Folder Hierarchies , click Next , and then Finish .
  2. Move the public folder hierarchy:
    1. Use ADSI Edit tool to locate the Public Folders object in Active Directory.
    2. CN=Configuration,CN=Services,CN=Microsoft Exchange,CN=Organization,CN=Administrative Groups,CN=Administrative group,CN=Folder Hierarchies,CN=Public Folders.
    3. In the right pane select CN=Public Folders , righ

Removing Exchange 2003 from the server object using ADSI edit.

  • CN=Administrative Groups
    CN=<Exchange 2003 admin group name>
    CN=Servers
    CN=<Exchange 2003 server name>
    You need to delete the Exchange 2003 server at this level to have it fully removed from your Get-ExchangeServer command results. 
After deleting the server, when I ran get-exchangeserver, it only showed 2010.

 To remove the routing group connector:

get-routinggroupconnector | remove-routinggroupconnector

Monday, January 18, 2016

No Certificate Templates could be found. You do not have permission to request a certificate from this CA

This morning I logged into my lab and I got an error while trying to access the Cert request enrollment.

 i received this error “No Certificate Templates could be found. You do not have permission to request a certificate from this CA, or an error occurred while accessing the Active Directory” .. That was so strange although i am sure i can access the certificate templates from the CA console and also the fact that i was using a Domain Admin account to issue the certificate.

I followed the link below to resolve the issue

http://theadminsguide.net/2012/08/29/no-certificate-templates-could-be-found-you-do-not-have-permission-to-request-a-certificate-from-this-ca/